Having in your survival bag a versatile item like a tarp will come in handy during an emergency situation. It will help you gather water, camouflage your supplies and it will provide a good shelter in case nothing else is available. Improvising a basic tarp shelter can keep your head dry, it will help you conserve heat and it provides a sense of comfort and safety.
A polyethylene tarp will go a long way and you should definitely get one for your bug out bag. It is lightweight, durable, draft-proof and waterproof. They come in a variety of sizes and color, and they won’t burn a hole in your wallet.
Making a tarp shelter is easy and there are dozens of different ways and patterns to construct a suitable shelter with only a single tarp.
Before you make your tarp shelter you must consider the following:
- The location of your shelter is very important and you should stop and think about it before building your shelter.
- The direction from which the wind is blowing should be taken into account or your shelter will sail away.
- The ground should be comfortable enough if you plan to get some sleep. Pointy rocks will keep you awake.
- The ground should slope slightly for the water to runoff.
- If there is no slope, you will have to dig some trenches around your shelter to aid drainage.
- Take into account the purpose of the shelter and make it as large as it needs to be.
- Consider the weather and chose a model that is stable and won’t collapse if rain or snow are expected.
Tarp Shelter Designs:
For all the shelter examples provided here, you can use a 10X10 foot tarp.
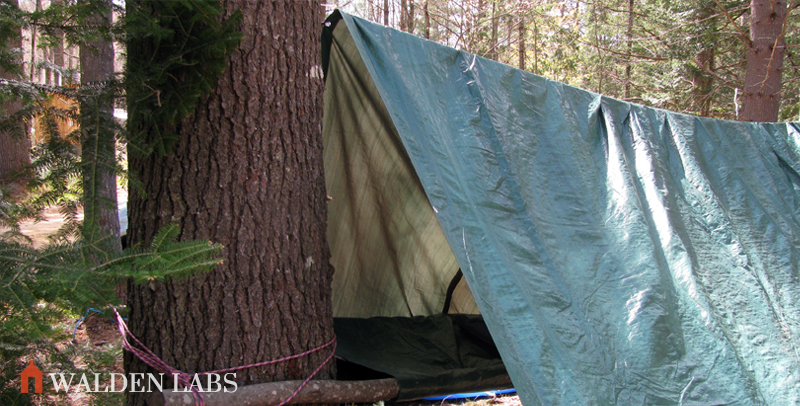
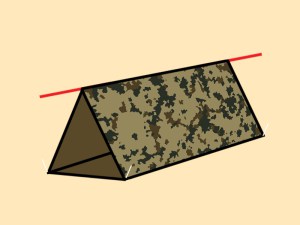
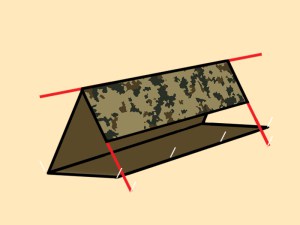
1. The A-frame tarp shelter
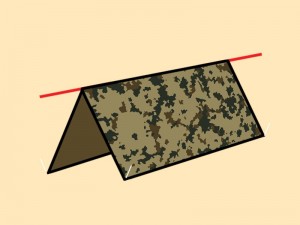 The A-Frame shelter is probably the most common shelter one can make. It can be made by stringing the paracord between two trees. Draping over the tarp and staking it down are the final steps required to make this common shelter. The 30-degree angle of the tarp’s roof will create a ten foot-long living area. The shelter will be 8.6 feet wide and 2.5 feet tall. This shelter provides a good rain and snow runoff and a good wind deflection. The downside of the A-frame shelter is that there is no floor and if you haven’t stretchered the paracord tight enough, there will be sagging in the middle.
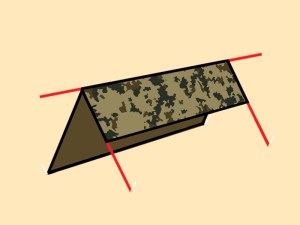
2. The Sunshade tarp shelter
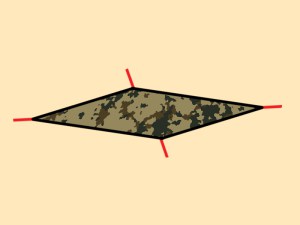 To create this type of shelter you will need four anchoring points to which you will tie the paracord. This is a shelter parallel to the ground and it’s designed to provide 100 square feet of shade against the sun. some people use this type of shelter during the rain because the water will pool in the middle and it’s easier to collect it. To make it sturdier you can add support poles to the corners. This basic sunshade tarp shelter will provide maximum protection against the sun, but it’s not suitable for cold weather and it can’t support rain for long.
3. The Lean-To tarp shelter
 This is another shelter that it’s simple to make and it’s great for deflecting wind or providing sunshade. To make this shelter you need to secure the tarp to the ground on the windward side and support it with the paracord between to anchor points. A 30 degree angle of the tarp will provide five feet of height and 8 feet of width under the shelter. This is an “on the go” shelter because it’s easy to erect and you can quickly take it down. It provides great wind deflection and it will keep you safe from rain or sun heat. The downside of this shelter is that there are not sides and no floor to offer protection against other elements.
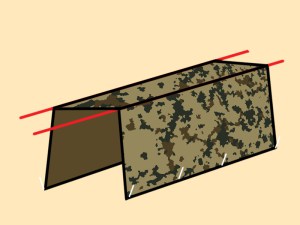
4. The tube tent tarp shelter
 This is a sturdy shelter that provides a floor and, if properly secured to the ground, will prevent rain from seeping in. To make it, you will need to secure the paracord between to trees and drape over the tarp with the opposite ends secured together. The sixty degrees walls will provide 3 feet of width and almost 3 feet of headroom. This should be enough room for a single adult.
5. The mushroom fly tarp shelter
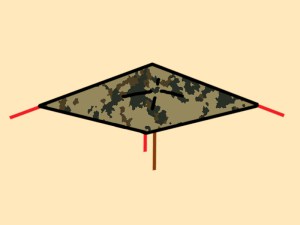 This type of shelter is very similar to the basic sunshade shelter but it adds a central support pole at the tarp’s midpoint. It is designed for rain or snow runoff and it’s pretty sturdy if you secure the four corners of the tarp well enough. You can make it as tall or as short as you need depending on the length of the pole. This shelter provides a great runoff for rain or snow, but it doesn’t have any sides to protect you from the wind or cold.
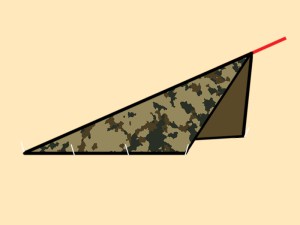
6. The cornet tarp shelter
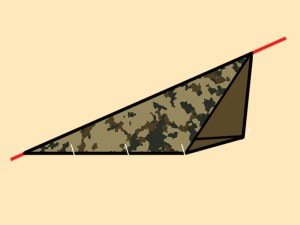 This shelter utilizes the entire length of the paracrod strung from a tree to the ground. The tarp is draped over the paracord diagonally, while the leading edges fold under to form the floor. The corner of the shelter must be faced towards the direction of the wind. You will also need to tie off some drip lines above the entrance of the shelter to prevent rain from running down the paracord and into the shelter. This is a good design for wind deflection and rain/debris shedding. The downside of this design is that it doesn’t offer too much head room and if you are a tall person, you might not have enough room for you and your gear.
7. The dining fly tarp shelter
 This is the favorite design for many camper and it’s a simple open air cover. It provides a good sunshade and enough headroom without sacrificing too much space. It keeps away rain but it provides limited protection against the other elements due to its lack of sides. When properly tied down and staked, the dining fly becomes a sturdy shelter and the height of the support pole will dictate the amount of headroom. This is a good model for desert survival because it provides good ventilation and adequate coverage.
8. The wind shed tarp shelter
 This type of shelter requires a little practice to get it done the right way. You will need to fold the tarp into thirds and make sure the leading edge of the roof hangs over the groundsheet for adequate rain runoff. The main ridgeline has to be secured with paracords while stretched between two trees. A length of paracord must be added to the bottom fold, where the back panel meets the groundsheet. It provides great wind deflection, but it requires a lot of secure points. The hanging roofline could also sag under rain loads and channel the water onto the groundsheet.
9. The Fold-Over Wind Shed tarp shelter
 This design is similar to the traditional wind shed, but it provides more coverage by sacrificing the groundsheet. The height of the paracord ridgeline determines the angle of the roof and the footprint of the shelter. It provides great wind deflection and rain runoff, but it doesn’t protect completely against the elements due to its lack of floor, flaps or sides.
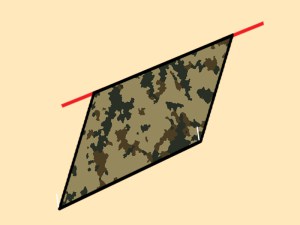
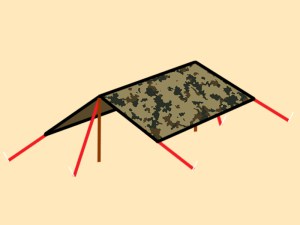
10. The diamond fly tarp shelter
 This shelter is suitable for two persons and it’s easy to make. You will need to secure the paracord to a tree and the ground, and drape over the tarp at a diagonal. The length of the paracord and the angle with which it is tied to a tree will determine the overall headroom and width of the shelter. The steep walls will shed rain and will deflect wind if they are well staked. This model will require drip lines, just like the cornet shelter. Depending on the size of the tarp, this shelter can accommodate more than two persons or more equipment, but the lack of a floor and flaps won’t keep out the elements. If the wind changes direction frequently, the shelter can be compromised.
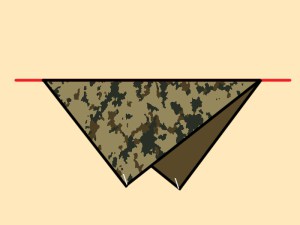
11. The arrowhead shelter
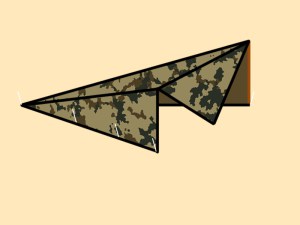 Start the construction of this shelter by supporting the center of two perpendicular edges with five foot long poles or by attaching those edges to trees using a paracord. You will need to stake to the ground the opposite corner so that it creates a series of four triangles. This design will provide 35 square feet of living space and five feet of headroom at the opening. The flap will hand down and make a partial closure. The poles need to be supported by paracord tie-downs. This shelter deflects wind with its low profile and it’s very roomy.
12. The half box tarp shelter
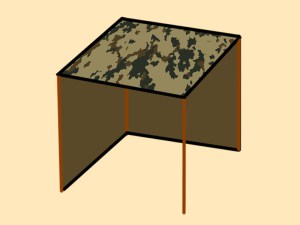 This shelter will require some time to be built and you need to use at least four support poles and as many or more tie downs to hold it all up. The footprint provided is 25 square feet and it has two sides of protection from the elements. If not supported in the middle or kept taut from the sides, it will sag under the weight of water or snow. A full one quarter of the tarp goes unused and folded up behind the rear corner. This type of tarp shelter provides good sunshade throughout the entire day if you position it properly.
13. The barn stall tarp shelter
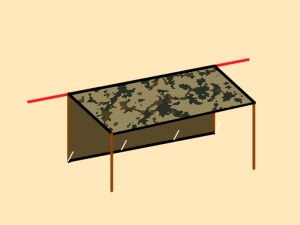 To make this shelter you can either use four five foot poles for support or two poles and a paracrod attached to two anchor points. The front is supported by poles and the single 90 degree wall provides enough protection, although strong wind can damage the entire structure. This shelter produces a 50 square feet living area but it has no floor. It’s simple to build, but it doesn’t provide adequate protection from the weather.
14. The Square arch tarp shelter
 As the name implies, this shelter is an arch with a square top. Starting with two parallel lengths of paracord attached to anchor points approximately 3 feet apart and 3 feet high, drape the ground cloth over the two lengths of paracord and secure the long ends of the tarp with stakes. This is a good shelter for narrow spaces, but the odds of finding four anchor points in the needed proximity is quite low. To allow rain to runoff, make sure you secure one paracord slightly higher than the other. This shelter is three feet wide, three feet wide and ten feet long.
15. The shade sail tarp shelter
 This is an easy and quick to build shelter and it requires to diagonally drape the tarp over a length of paracord attached to two anchor points. The opposite corners of the tarp are staked to the ground. This is an open and airy shelter and the lower the angles of the sides are, the better it will deflect wind and the more shade will provide. It provides all day shade and it requires minimal stakes and set up, but it’s not weather resistant and it will not keep you dry.
What not to do when building a tarp shelter:
- Don’t build your shelter over an ant nest or any type of burrows
- Don’t set up your shelter beneath a dead tree or in the vicinity of one
- Don’t attach tarp lines to a tree standing alone or to tall trees. Always go for the short tree in a group of taller trees.
- Don’t set up your shelter below the high tide mark of a shoreline
- Don’t set up your shelter on top of a hill or ridge.
- Don’t set up your shelter on a river bank
Making a tarp shelter is not rocket science and with a little bit of practice anyone should be able to make one. Learning these tarp shelter patterns will come in handy during an emergency preparedness situation.
Stay safe and God Bless!